

Build Your Own Affordable Laminar Flow Hood: A Mycology Guide
Overview
Entering the world of mycology, whether as a hobby or a serious scientific endeavor, is an exciting journey. Having the right equipment is crucial for success and one of the most essential pieces of equipment is a laminar flow hood. However, commercial laminar flow hoods can be costly and heavy, putting them out of reach for many budding mycologists.
In this guide, we’ll walk you through the process of creating your own portable, efficient, and affordable laminar flow hood for under $100. We’ll discuss the importance of a laminar flow hood in mycology, the components you’ll need for this DIY project, a step-by-step assembly process, how to test your newly built laminar flow hood, and best practices for its use.
We promise to make this guide easy to understand and follow, regardless of your experience level. And the best part? The design we’re going to share is proven to work, passing rigorous tests, and enabling you to maintain a sterile working environment crucial for successful mycological work. So, without further ado, let’s dive into this exciting project.
Essential Components For Your DIY Laminar Flow Hood
Before we begin the assembly process, let’s first gather all the necessary components. The beauty of this DIY project is that it requires only a handful of items that are easily available. Here’s what you’ll need:
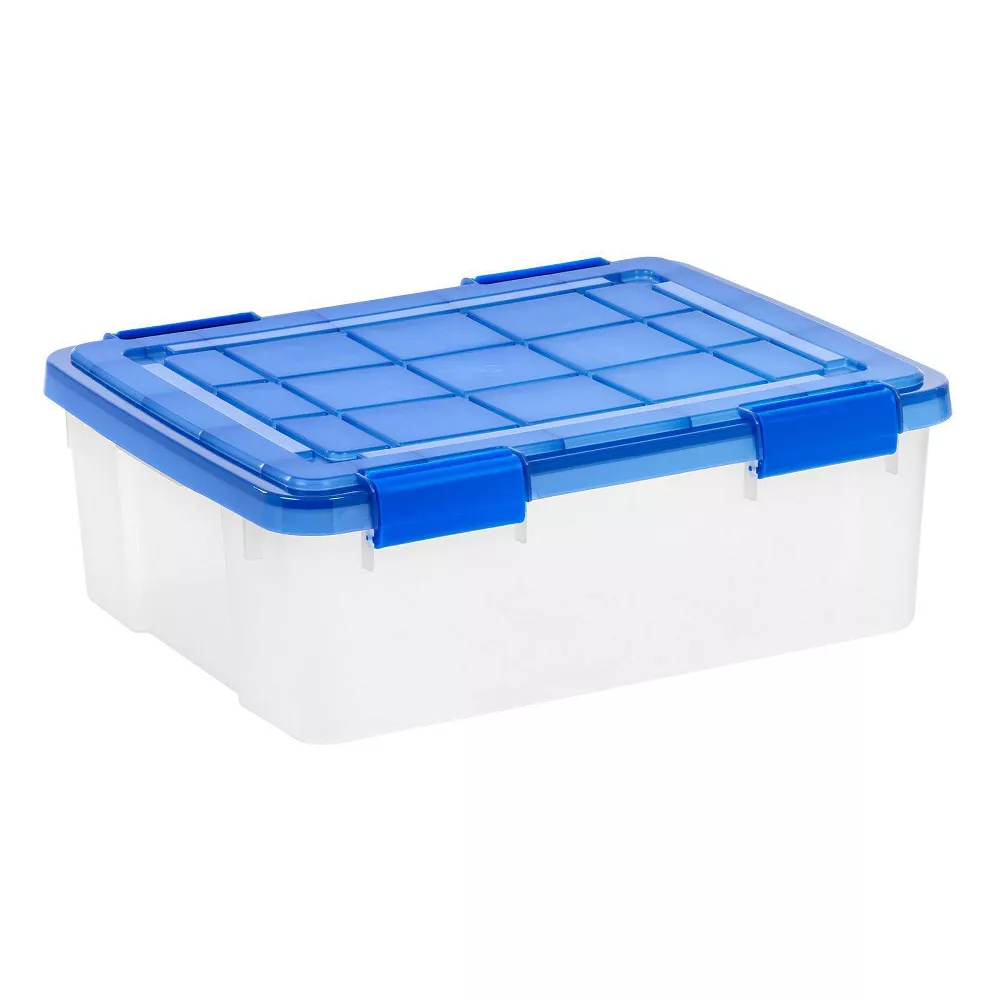
IRIS 26.5 qt. Clear Plastic Storage Box
This tote, available at Home Depot, serves as the main body of our laminar flow hood. It’s particularly well-suited to work with the fan we’ve selected. However, because the contours in its lid, this model requires additional sealing. The bonus? Its slim design ensures that it can conveniently fit on a counter, leaving you ample space to work in front and it has the advantage of a lid that seals. No more air leaking out around the edges of the lid.
Also it is important to not that if you go with a different fan that you may have to purchase a different tote to accommodate possible difference in the fans size.
Selecting the Right HEPA Filter
To ensure the effectiveness of your laminar flow hood, choosing the right HEPA filter is paramount. Our choice for this project is the LV-PUR131 Replacement Filters, conveniently available on Amazon.
These filters are genuine HEPA filters, capable of filtering out 99.97% of dust, pollen, mold spores, and pet dander particles. They’re well-built, highly efficient, and notably, come with a pre-carbon filter. This pre-filter adds an extra layer of filtration, capturing large particles and prolonging the life of the main HEPA filter.
Additionally, they’re cost-effective and easy to replace, ensuring the longevity and performance of your flow hood won’t be compromised by expenses.
Remember, always be wary of counterfeit or subpar filters when shopping. Genuine HEPA filters are a necessity for a successful laminar flow hood.
Selecting A High Quality Fan
After securing your tote and HEPA filter, it’s time to select a high-quality fan to provide the necessary airflow for your laminar flow hood. For this project, we recommend using the KEYFANCLUB EC Axial Muffin Fan, available on Amazon. This fan is similar to a standard 120mm computer fan, but with an added advantage: it comes with a 110v cord. While it isn’t a variable-speed fan, it still gets the job done effectively.
Additionally, we’ll also use 120mm Computer Fan Filter Grills with screws. These grills serve two essential functions: they prevent accidental damage to our fans and they make it easier to cut out the exact size for our fans in the tote. More importantly, using these grills avoids the unfortunate situation where an object placed on top of the flow hood falls in and blocks or damages our fans.
Bolts, washers, and silicone sealant
These items will secure the fan and filter to the tote. If you purchased the fan above it should come with the bolts and nuts needed. If not they can easily be procured from your local hardware store. You will still need to purchase a tube of silicone sealant from the local hardware store. If you don’t have a caulking gun a squeeze tube of clear silicone should still work.
Basic tools
For the assembly process, you’ll need a drill, a cutting tool (such as a rotary tool, a jigsaw, or a woodburning cutter), sandpaper, a screwdriver, and a caulking gun. In this tutorial we will be using a Oscillating Multi-Tool for cutting and a drill for pre-drilling our fan holes.
Assembling Your Flow Hood
With the required tools and materials at your disposal, let’s dive into the actual assembly of your DIY laminar flow hood. We are working with tools for cutting and power tools so remember to wear personal protective equipment and to be safe.
Preparing the Tote
The preparation of your tote is a crucial stage in the construction of your DIY flow hood. It involves marking out the area where the filter and fan will be fitted. Here’s a step-by-step guide on how to prepare your tote:
Arranging And Drilling Holes For The Fan
To ensure the correct alignment and efficient installation of our fan later on, we’re going to use the fan grill as a guide for drilling mounting holes. Here’s how:
1. Positioning the Fan Grill
Position one of the 120mm Computer Fan Filter Grills inside the tote, towards one of the long edges. It should be placed as low down as possible before the tote’s curve starts to cause the grill to jut out.
2. Marking the Holes
Once you’re satisfied with the position of the fan grill, use its holes as a guide to mark the points for the fan mounting holes on the tote.
3. Drilling the Holes
Use a drill to make holes at the marked points on the tote. Ensure that the holes are just big enough to allow the mounting screws to pass through.
4. Threading the Mounting Screws
Thread the screws from your fan through the freshly drilled holes in the tote. This step ensures that the fan will be perfectly in place during the subsequent stages of assembly.
5. Tracing the Fan Opening
Position your filter inside the tote. From the outside of the tote, trace around the inside edge of the fan filter grill. This will provide a guide for cutting out the fan opening in the next step, ensuring a perfect fit and a professional look for your DIY laminar flow hood.
With the locations of your filter and fan now marked out, we’re all set to proceed to the next step – cutting out these areas and installing your components.
Cutting the Fan and Filter Areas
In this section, we’ll walk you through the process of cutting out the areas for the fan and the filter. We recommend using an oscillating multi-tool for this process due to its versatility and precision.
Cutting The Filter Area
Start by cutting along the inner lines you marked out for your filter using your oscillating multi-tool. Remember, these lines are 5/8 of an inch inside the original outline to create a lip for the filter to rest on. Be sure to wear appropriate safety gear, like goggles and gloves, while cutting.
Once you’ve cut the hole, smooth the edges using sandpaper or a file. This not only makes your project look more professional but also helps ensure a good seal when you’re applying the silicone later on.
Cutting The Fan Area
Next, move to the markings for the fan. Use your oscillating multi-tool to carefully cut out this shape. Take your time during this process as precision is key.
Once you’ve cut out the area for the fan, smooth the edges as you did for the filter hole. This prepares the surface for a better grip when you mount the fan using bolts.
With these areas cut out, your tote is ready for the next steps of the installation. In the next sections, we will be covering how to mount the fan and filter to your tote.
Remember, patience is key in these steps. Take your time, and you’ll end up with a neat and professional-looking DIY laminar flow hood.
Add Your Heading Text Here
Marking The Filter Area
Place your filter against the inside of the tote lid and trace its outline. Ensure you position the filter as far down to one of the longer edges as you can without it interfering with the opening and closing of the lid. Try to keep the filter centered for optimal performance.
Next, draw a second set of lines about 5/8 of an inch inside the original outline. This will form a lip for the filter to rest against and will provide a good surface area for us to apply the sealant later on.